
Part 2 of Designing a Repeat Pattern: Sketch to Illustrator
(This is Part 2 of a 3 part post that goes through my entire design process from inspiration to finished block print! You can read Part 1 here.)
In Part 1 I went over how I first came up with my design, and now we are ready for the next step which is importing it into Adobe Illustrator.
(Side note: This step is not necessary, but working digitally can save you tons of time. It also helps you visualize the end result of your pattern before you do any more physical work, so I recommend it!)
Here is my original sketch:

Once I have a pencil sketch that I am at least medium happy with, I like to trace over it with a dark line, take a quick photo, and email it to myself.
Nothing at this point needs to be perfect. I'll use this image as a base for my design, and mould it into something I hopefully love by the time I'm done with it.
Next I open up my email and download the image to the desktop, and open it up in Adobe Illustrator.
Once I get my design into Illustrator things get a lot more fun. Turning those first few thoughts into concrete drawings is really the hardest part.
I like using Illustrator because I'm able to easily convert my sketches to vector line art using the Image Trace feature. Vector art means the drawing is made out of lines rather than pixels (which is called a raster image).
Photoshop uses raster images, Illustrator uses vector images. The main reason I want to use a vector drawing is so I can draw it at any size, and then resize it when I'm done without having to worry about things stretching out or getting blurry.
This is not what happens when you try and stretch out an image in Photoshop. The pixels stretch out, blur, and it looks horrible. In Illustrator, everything stays clean and perfect.
Another reason I like Illustrator is because I can draw in the program using the pencil or the pen tool. I like to use my Wacom bamboo tablet if I have it on hand in combo with the pencil tool to draw directly into the program.
However, most recently, I've found that drawing in my sketchbook and importing those sketches into Illustrator gives me more control (I'm a little old school and like to have the pencil in my hand.)
Anyways, below is what it looks like when I import my sketch into Illustrator, select it, and open the Image Trace menu:
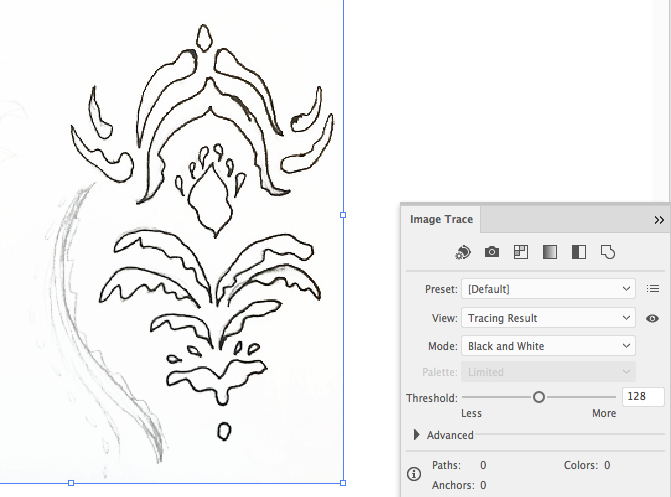
First I’ll hit the little black and white button which will turn the whole image into a vector drawing and make my sketch into black editable lines.

Some of the tiny shapes will get filled in, but that’s ok for now and I was probably going to fill it all in anyways. You can see the whole thing now looks a lot cleaner.
Next, I want to adjust the threshold which will fill out the lines where they didn’t quite show up in the drawing. You can increase it to add more ink, or decrease to remove it.

If you look at the threshold box in the menu you can see that I increased it to 205 from 128. I like to make it higher rather than lower so I have more to work with. You can also see that the black lines are a little thicker.
After this step I want to start pulling things apart, so I’ll need to expand the entire image before I can do that (right now everything is in one big piece).
I’ll go up to Object in the menu and select Expand. That kind of explodes it into pieces although it looks like nothing happened.

Next I go to Object again and select Ungroup. This separates the smaller pieces. You will probably have to do this a few times until the Ungroup button turns grey. I usually do it around 3 times.
Then you can go back to your design and start getting rid of the pieces you don’t need. There will be some white background areas you’ll need to delete and probably some stray black marks. Just click on them and hit delete.
I then finish it up by grabbing the Shape Builder Tool (Shift + M) and drag it through each piece to make it a solid instead of an outline.

If you’re unfamiliar with any of these tools, it’s really easy to google quick tutorials on each one. I learned a lot just doing that when I needed to brush up my skills.
Once I have cleaned up the entire image and arranged it how I want it, I can start playing with colors and composition. I can also add new shapes, delete shapes, repeat it, and start seeing how all the pieces connect together.
**Warning! If you are drawing new shapes in Illustrator, make sure you will be able to carve them once you get to the printing stage! You can draw a lot smaller than you can carve, so don’t make it too detailed!**

Oh, and this is the design I've been working on! See how I used the leaf shape?
For this design, I started with the red shape and the blue part was actually on the top of the red.
It seemed a little busy so I chopped off it's head, changed the color, then moved it to the side as its own stand alone piece. Headless horseman style (cue childhood nightmares).
For now, I’m going to take out the blue piece and maybe use it for another pattern. I’m going to stick with the red piece and keep it simple.
Here's an example of a single element print with a "half drop" repeat, as in, every other column is dropped, half the length of the one next to it. This is a very common repeat, especially with drapery and wallpaper, also one of my faves (mostly cuz I’m lazy).

I'm still thinking about making this pattern multicolored and adding in another shape, but since this will eventually get carved and printed, I have to keep in mind WHAT A PAIN IN THE BUTT that will be when it comes to printing time.
Remember, I'm often printing yards of these patterns, not just quick projects. So as much as I love multicolor prints, they're not always practical for what I do (unless someone wants to pay me extra for all that time I'm putting in! Then by all means..).
Once you get through those first few steps and cleaning up the initial sketch, you can kind of just play around and have fun. I don’t even make the repeat perfect yet, usually I’ll just copy the design a few times and make a small block of it to see what it would look like.
So that’s the main gist of my Illustrator process.
In the next post coming up, I’ll go over how to scale, print, and get your pattern all set up for fabric printing.
<<>>